Friday, December 18, 2009

Use Poinsettias for a Vivid Christmas Display

Poinsettias are vibrant plants to display at Christmas. As a centerpiece on a dinner table, in a basket on the floor, or in a grouping on a coffee table they make a dramatic display. They can be lovely grouped in an unused fireplace or sitting on a table or chair in a foyer. For the price, they pack a lot of color and decorating impact. Paired with pinecones and ever-greenery, poinsettias make not only a holiday display but also look festive all winter. Striking as always in deep red, poinsettias are now available in pink, creamy white and or coated with glitter or powder to look like snow. Sometimes they are even mixed in with other houseplants, all in one container. When potted as a single plant they usually are sold with a plastic foil wrap around the pot. When bringing it home from a store, keep the plant itself covered to protect it from cold. Poinsettias are semi-tropical plants and don’t like temperatures below 55 degrees. Below that temperature they will drop their leaves.

With proper care a poinsettia will keep its colorful bracts, the red leaves that give it color, for months. When purchasing, look for healthy plants, avoiding plants with curled leaves or browned leaf tips. Water the plant when the first two inches of soil is dry. Don’t let the pot sit in water, especially in plastic foil. Un-drained, it will quickly develop root rot. But if it dries enough to curl the leaves, quite a few leaves and bracts will drop off. Fertilize with houseplant fertilizer after the first month, fertilizing every two weeks thereafter. Keep in a very sunny location for at least six hours a day. Low light will also cause leaf drop. Keep from cold drafts or touching cold windows.

Poinsettias are not poisonous to people or pets, although this is a popularly held notion. Careful testing by Extension Services has demonstrated that eating poinsettia might upset the stomach but it is not poisonous.

Who has not seen a pitiful, leggy poinsettia in early February, with most of its leaves dropped? The plant has either been under or over-watered or not given enough light. It can be trimmed back and resurrected by the care described above. Poinsettias grow year round in Florida and further south and will grow outside in pots in Kentucky over the summer. They will get three to four feet tall if repotted and will continue to bloom. Bring them indoors in September. Continue fertilizing and watering the plant and it will reward you with its vivid colors for as long as you wish to keep it.

Thursday, December 10, 2009

Gifts from the Garden

Gifts from and for gardeners are novel and appreciated. Don’t overlook garden gifts just because gardening is a warm weather pastime. Gardeners are usually longing for warm weather, thinking about next summer’s flowers and fretting about weeds in their flowerbeds that won’t freeze.

Gifts from the garden are unexpected and give a long time. Give a hanging pot with petunia seeds. Take an 8 or 10-inch diameter hanging pot. Fill it with potting soil. Potting soil is still available in home and garden stores. Sprinkle with petunia seeds. Cover seeds with ¼ inch of soil. Wave© petunia seeds are readily available and the most prolific petunia. Water the pot by sprinkling very gently. No need to soak it. Cover with kitchen plastic wrap. Tie a bow around the rim of the pot, securing the plastic wrap and decorating the pot. The plastic stays on until the seeds sprout. Instruct the gift recipient to place in a sunny window. Include the seed packet with the gift. These will be ready to place outdoors in April and bloom on schedule for spring. Flower enthusiasts will love it.

Christmas themed gifts of greenery are treasured all winter long. Pine and cedar blanket our mountains and trimming inconspicuous boughs for gifts will do little damage. For centerpieces wire a few sticks together, leaving a space in the middle. Tuck greenery into the sticks and secure with wire. Add a red or gold candle to the middle. Wire in some small, colorful Christmas ornaments and a bow. You have a centerpiece that makes a lovely hostess gift. Care must always be taken to avoid fires.

Pine swags decorated with pinecones and red plaid ribbon are versatile. Everyone has a mailbox and most mailboxes could use a pine swag. Bunch the greenery with wire and trim with ribbon. Outdoor greenery gifts will last all winter and be remembered kindly, long after Christmas.

Seed packets themselves make wonderful gifts. The miracle of seeds makes everyone want to garden. People like to start seeds indoors in February, so gifts of seeds get the gardener dreaming early. Seed starter kits are also available. A few seed packets tied with raffia make a nice gift or the packets can be tied to a gift package. Attractive flower seed packets can even be matted and framed and have a special beauty to the gardening enthusiast.

For the gardener, gardening hand tools and gloves are treasured. Most can use an extra hand spade or a hand pruner. Most gardeners like some fertilizer for flowers. Baskets and tool trays are welcomed to keep their tools handy as they move around their yard. Hose nozzles, hose repair kits and hose timers would be a useful surprise. Novelties like decorated stepping-stones, cone shaped vine trellises and flowerpots catch the gardener’s eye. What is popular in spring and summer will bring a smile to your favorite gardener.

Tuesday, December 1, 2009

Bring the Outdoors Inside – Botanicals of Pressed Flowers or Leaves


Remember the leaf scrapbooks we made in grade school? Who would imagine the simple techniques we learned then could create exquisite art? Or you could make something so lovely without having artistic talent. Nature is the consummate artist; we are the preservers of beauty literally showered upon us.

Pressing flowers and leaves starts with picking attractive plants. Roses are still in bloom and some colored leaves remain on trees. Interesting weeds and ferns abound. These press well. Pick the brightest colors and the most interesting leaf shapes. Compound leaves do well also. Pick extras.

Use thick books to press. I have an old set of encyclopedias that are really great. Lay the flowers in the pages and gently open the flower up as much as it will. If petals fall off you can attach them later. Lay the leaves flat on the pages as well. Don’t lay any plants on top of each other. Close the book and lay a few heavy books on top. Several plants per book will work. Leave undisturbed for a couple weeks. Low humidity is best.

If you are in a hurry you can press the plants between wax paper with an iron. Use a low temperature. Press lightly until you are satisfied with the results. Remove the wax paper gently.

Pressed flowers and leaves are sometimes called everlastings, ephemera or botanicals. Your pressed ephemera can be framed, applied to the outside of frames, glued on cards and invitations or decoupaged onto furniture surfaces. The applications are numerous. In pressed plants you have true natural art with beauty all its own. Use your imagination.

Inexpensive frames and mats can be purchased to match your décor. Depending on your frame size, scrapbook papers make attractive paper to affix your plants. Lay out the flowers or leaves and arrange them with the mat in place so that you know how large your actual lay out space is. Arrange the plants delicately as they are very fragile now in their dried state. Use toothpicks and tweezers to move them. Trim off some leaves from flowers that look too busy. Make arrangements of 2 to 3 flowers, like a freshly gathered bouquet. Arrange fall leaves to capture their falling motion or line them up like a scientific study.

When you like the arrangement, place a tiny dot of lightweight glue under each plant and its petals, stems or lobes. Press lightly and allow drying overnight. Place in their mats and frames. Botanicals fascinate because they are real. Botanicals are often hung in a series, either in a row or a series of rows. To buy them in quantity from a store is expensive. If you make them you will save a lot.

These make lovely hostess and Christmas gifts. From a single leaf or flower to a group in a frame, or combined with a photo or poetry, botanicals are a gardeners gift from nature. From you, the gardener, they’re a natural!

Friday, November 20, 2009

Fall Lawn Care

Fertilizers: If you plan to fertilize once a year, make it in the fall. Cool weather grasses like tall fescue and Kentucky bluegrass are the most frequent lawns grown in Kentucky. These grasses grow best in the fall, especially their roots. Fertilizing at this time builds the root base to prepare the grass for the hot summer months. You can still fertilize in December if you missed in the earlier fall.

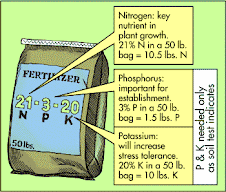
Fertilizers contain three main nutrients, Nitrogen (N), Phosphorus (P), and Potassium (K). Once applied, phosphorus and potassium remain in the soil for several years. Nitrogen washes out. These nutrients are expressed in ratios on fertilizer packaging, to represent N-P-K. A ratio of 10-10-10 in a 30lb. bag of fertilizer means 10 pounds of nitrogen (N), 10 pounds of phosphate (P) and 10 pounds of potash (K). The fertilizer is called ‘balanced’ when the three numbers are equal. When a proper level of P and K is reached in the soil, little additional P or K may be needed for several years.

A new lawn will need a balanced fertilizer. An established lawn will need a fertilizer higher in nitrogen. Regular fertilizing helps prevent weeds. “Weed and Feed’ fertilizers contain herbicides as well. Those containing crabgrass and other grassy weed killers should be applied in mid-April to mid-May. Broadleaf herbicides can be applied in fall and spring.

If you have not had your soil tested before, take two pints of randomly gathered soil to the Extension Office (Rowan County Courthouse or Carter County Courthouse for these two counties). For a few dollars you can get a soil profile that tells you if your soil needs phosphorus (P), potassium (K) or lime. The acidity level of your soil is also analyzed. Based on the Extension recommendation you can apply the needed nutrient to your lawn. You will also add nitrogen. If you are familiar with farming fertilizers, these are cheaper. However they are harder to apply, more apt to burn a lawn and are not formulated to pop right into your spreader. Use these only if you truly know how to use farm fertilizers.

Mowing: Mow often, mow high and keep the blade sharp. Cutting grass too short is the most common damage done to grass. Grass grows more in spring and fall and needs more mowing at those times than in the heat of summer. Kentucky bluegrass should be mowed 2 to 2 ½ inches high. Tall Fescue and Creeping Red Fescue should be mowed 2 to 3 inches high. Mowing shorter than these heights restricts root development, and grasses become easily diseased, or heat and drought damaged, not to mention more easily infested with weeds. Here is a general rule to follow: Mow often enough so that no more than 1/3 to ½ of the grass leafage is removed at any one time. If the grass grows too tall, raise the mowing height, and mow again in a few days. Don’t mow it all at once. You will damage your grass.

Tuesday, November 10, 2009

Fall Preparations: Raking, Mulching, Pruning and Planting


Our leaves just fell yesterday, as sudden a leaf fall as I remember. A large cold front blew in rather fiercely and downed all the leaves. The chill in the air is our notice to prepare the home landscape for winter. In preparing for winter you will probably want to leaf rake, mulch, transplant or plant and evaluate trimming and pruning.

Raking: If you have oaks, leaves fall all winter! Our large oaks seem to have a perpetual supply of leaves strategically released after we get the last batch raked. As much as I love the look of leaves on the ground, for the home landscape, leaf raking is a necessity to preserve the lawn. Leaves left on the ground will smother grass creating bare spots in spring. Bare spots invite weeds. Mulch mowers help at first but as leaves pile up too much leaf mulch will kill grass. So as much as you may not want to, rake your leaves. Leaves that pile around shrubbery and tree bases can serve as winter mulch and can be left in place. Raking a couple of times instead of saving it up makes the job easier. Use a steel tined rake to prevent leaves getting stuck in the rake.

Leaf raking does rob soil around trees of a continuous supply of nitrogen, and detracts from natural soil building. But unless you have a naturalized area where grass growing is not your goal, you leaves should go. Leaf burning is restricted in some areas so consult your local forest service. Leaves deposited in a nearby woods release their stored carbon much more slowly and are therefore are better disposed ecologically than burning.

Mulching: Leaves can be used for winter mulch on a vegetable garden and around shrubs. For landscaping appearance however shredded bark mulch is most desirable. Mulch in summer controls weeds and retains moisture. In winter, mulch insulates plant roots against early freezing, before the plant fully enters dormancy. Roses benefit from mulching over their graft union. Two to three inches of mulch will usually suffice for most plants. Usually heavier mulch is applied to contour the shape and height of the bed, rather than for needs of the plants themselves. Mulch purchased by the truckload from mulch companies or landscaping concerns is much less expensive than purchased by the forty pound bag. If you are mulching an area larger than ten feet by ten feet, mulch by the truckload will save considerably.

Planting and Transplanting: Fall is a good time to plant or transplant trees and shrubs. Nurseries and home improvement stores make a large selection of these plants available at this time of year. Trees and shrubs planted until the ground freezes, which is usually mid to late December in Kentucky, will fare well over the winter and be ready to get the full benefit of spring growth. Plants in containers transplant the best. If transplanting directly from the ground, plant as early in the fall as September or October to give the plant roots time to recover and grow additional root endings. When a plant is transplanted from the ground its terminal roots and root hairs are usually damaged. As these are the areas a plant absorbs water and nutrients, these are the root areas most important to reproduce themselves. A little time is needed for root growth. Trees and shrubs in pots experience much less root damage and can therefore be planted later into the fall. Plant as you normally would but do not fertilize. You only want the roots to grow, not the plant above the soil line.

Pruning & Trimming: Pruning in fall should be kept to a minimum. Roses can be trimmed of their last flowering, but most other trimming should wait until spring. Trees and shrubs enter dormancy based on length of daylight. No daylight savings time for them! Part of their preparation for dormancy involves the setting of terminal buds, which helps the plant not grow anymore until spring. A late fall trimming shears off the terminal buds and confuses the plant. It will try to grow new terminal buds and delay dormancy. This can cause parts of the plant to be damaged by freezing. Prune woody plants and trees in spring and again in summer if you like. Shrubs can be trimmed many times in summer, but make the last trim in late August or early September.

If you accomplish all of the above you will have done a lot to put the landscape to bed for the winter. A final mowing and string trimming of the lawn in mid-November will add to the neat appearance of your home all winter. Bring the birdfeeders closer to the house so you can see them from your windows. Set out some dried, shelled corn for the squirrels, deer and wild turkey. Enjoy the panoply of fall and winter from indoors knowing that as you sit snugly indoors your yard and garden have been nicely buttoned down for the winter.

For additional information visit www.uky.edu/Ag/HLA/homehort2.html.

Friday, October 23, 2009

Planting Spring Bulbs in Fall

Fall is such a vibrant time of year, so colorful, bracing and chock full of events. Even though it is nature’s way of putting plant life to bed, it is our time of starting things anew. So you could be forgiven if planting bulbs for spring is really low on your list of priorities. However, by January and February, the dramatic beauty of fall is a waning memory. The hunger for spring and the cheer of flowers reaches serious proportions by March. A brief effort now and daffodils, tulips or crocuses can be peeping out around your doorway, cheering you and all who enter.

Planting bulbs is not too complicated. Tulips, daffodils, hyacinth, crocus and snow drops all surface very early, poking through ice and snow. Purchase them online or at a home center. Now is the time to plant them and they can be planted until the ground freezes, usually early December. Bulbs will grow roots during the fall and winter. Select a sunny, well drained location. Avoid wet, low-lying sites. Plant them a depth of two to three times the diameter of the bulb, although this will usually be specified on their packaging. Daffodils and tulips will be planted at about 8 inches deep and smaller bulbs will be 3 to 4 inches deep.

To plant, prepare a hole to hold a few bulbs, spacing the bulbs 2 to 3 inches apart, using 10 to 15 bulbs per hole for a small area. Dig larger holes or trenches for larger areas of bulbs. This is easier than trying to dig a hole for each bulb. Bulb planters will usually bend in Kentucky clay. If you are determined to dig individual holes, consider a bulb auger, an attachment to an electric drill. This digs holes very quickly! But it does not prepare the soil as well. Otherwise, loosen the soil a few inches below the prescribed depth. Amend your soil with organic matter. Add some bone meal. The prescribed depth of the hole is measured from the bottom of the bulb. The tapered end of the bulb points upward. Cover the bulbs with soil, add two inches of mulch and water well.

After spring bloom, don’t mow the bulb foliage until it turns yellow. The foliage is making carbohydrates in the bulb to store for next years growth. Premature mowing will interrupt this process and weaken the bulb, making the next flowering smaller. The reliable return of bulbs is the part of the fun. So plant them in ground cover, around shrubs, trees or perennials. Or hide their spent foliage with annuals. Let them blend in and reward you well the following year.

Some bulbs naturalize, which means multiplying and spreading. Others do not. So if naturalizing is your wish, be sure the bulbs you buy specify naturalizing. Keep your bulbs cool, dark and dry until planting. Tuck a few bulbs into flower boxes sheltered well by your house. Imagine the cheer of spring flowers in April in your window boxes! So pick a sunny, fall afternoon and devote it to planting some bulbs. The reward in spring will return for years to come and seal the promise of yearly renewal. You will never regret a flower!

Friday, October 2, 2009

Fall Mums

As Fall approaches we look forward to outdoor decorating with mums, fodder shocks, and pumpkins. Who hasn’t wondered why they can’t seem to salvage those beautiful pots of mums after they pass their prime bloom time? If you have had trouble raising mums experiment with the following tips.

Fall Chrysanthemums can be displayed in pots and will hold their blooms for two to three weeks or more. They will not bloom much more than this initial flush of blooms for the season at hand. However they can be planted and enjoyed for a few years to come. Be sure buy plants that are designated ‘hardy’. Water every other day when they are in containers. If you buy plants with buds they will open in a few days.

Keep in mind that the mums bought locally in Kentucky are bred for container life and not all are hardy. They have more foliage than root, which does not support fall planting. To make them grow in the ground it is necessary to realize two mum preferences. First, mums like to be planted in the Spring. You can try fall planting, I have had reasonable success. Or the mums can be over-wintered in the basement or garage and planted in the spring. In spring they have a better chance of survival. To over-winter, trim back the spent foliage in late October or early November and place in the garage with exposure to daily light. Water enough to keep the roots moist, once a week should be plenty. Plant in April, fertilize monthly and pinch back when the shoots get about six inches long. Continue pinching or trimming back until late July. Two major trims are adequate.
Second, regardless of when you plant them, mums do not like wet roots in the winter. That is a problem in Kentucky, much more so than any cold temperatures. We have very wet winters and locally we have a lot of heavy, clay soils that don’t drain well. This is particularly true close to houses and front porches, where mums are often planted. The disturbed soil from the digging of home foundations and basements contributes to root rot.

To compensate for this drainage problem, try planting mums in raised beds of very well drained soil. Mums will even grow in raised beds of fine mulch alone. What won’t work as well is filling a hole with good top soil and planting your mum in the amended hole. You just created a bowl that doesn’t drain well. Instead, dig a shallow hole, about half the depth of the root ball. Keep half the plant a few inches above the original soil level. Mound a small bed of loose soil around the plant, if not using a raised bed. This gives the plant raised, loose soil to spread its roots. Do not take the mulch above the crown (where the plant meets the roots) if drainage is going to be a problem. It is not necessary to mulch the mum heavily to keep them warm or moist. Your goal is good drainage. If you have had trouble with mums it is probably because they were smothered with mulch and clay in an effort to keep them warm. Forget that! Keep them drained.

Armed with this knowledge, you can safely decorate with potted mums and still have a strategy for growing them the following year. So decorate your lamppost or mailbox with fodder shock. Tuck in some pumpkins and gourds –and fall mums!